What Penetration Testing Tool Combines Known Scanning Techniques and Exploits
February 9, 2023
How Organizations Should Prepare for Penetration Testing
February 10, 2023
Following the long tradition of explaining the basics, before moving forward with the setup of GoPhish, let us first understand what exactly phishing is.
Phishing is a social engineering attack wherein any communication with the target appears to be coming from a legitimate source. Although this is usually done via emails, the goal of any phishing campaign is to harvest as much sensitive data as possible. Here, sensitive data can be anything from your credentials to your credit card details to your employment details.
So, let’s start our GoPhish journey by understanding the process involved in Phishing. In the later part, we will delve deeper into the flow of Phishing and learn more about how it works.
What goes with the flow?
We’ve divided phishing into three main categories:
- Lures: Setting up a phishing campaign server and then creating emails, Websites, etcetera to make the source of phishing look as legitimate as possible.
- Collection: After a successful phishing campaign, the collected data needs to be filtered out and separated from unnecessary data.
- Post exploitation: The filtered data can now be used to perform attacks such as credential stuffing on various services on the internet.
What is GoPhish?
GoPhish is an open-source phishing simulation tool, i.e., a phishing framework that automates most of the tasks related to a phishing campaign, such as e-mail template creation, campaign execution, and tracking the campaign results.
GoPhish Download and Setup
To perform a download & installation of GoPhish, you preferably need to have an RDP, as you may need to run the phishing campaign for multiple days, and for that period of time, the system running GoPhish needs to be switched on.
You can get GoPhish from here.
We will host GoPhish on a Windows RDP server with a public IP address for this blog. Why Public? We will discuss that in the section “GoPhish flying over the Internet.”
Enough with the theories; let’s jump into the execution.
Installation using GoPhish binaries
GoPhish is generally easy to install, considering that the tool’s developers were also able to release binaries for different OSs. They’re as easy as downloading the GoPhish ZIP file, extracting the binaries from the ZIP, and executing them.
The binaries can be downloaded right here.
Installation from the source
GoPhish can also be installed from its GitHub source by using the below command.
go get github.com/gophish/gophish
FYI, you need to have golang configured in order to install GoPhish from the source.
Getting to know your config.json file
Like every good tool, GoPhish also has its configuration file in config.json. This config file contains configuration details for the tools that decide its smooth execution in the future.
This config.json file is located in the GoPhish root directory. Below are the necessary key configurations that can be set according to the need of execution.
| Key | Value(default) | Description |
| admin_server.listen_url | 127.0.0.1:3333 | IP/Port of gophish admin server |
| admin_server.use_tls | false | Use TLS for admin server? |
| admin_server.cert_path | example.crt | Path to SSL Cert |
| admin_server.key_path | example.key | Path to SSL Private Key |
| admin_server.trusted_origins | [] | Comma separated list of trusted origins |
| phish_server.listen_url | 0.0.0.0:80 | IP/Port of the phishing server – this is where landing pages are hosted. |
GoPhish flying over the internet
In the config.json file, the key phish_server.listen_url is, by default, configured to listen on all the interfaces, meaning if the host Gophish is running on a system that is publicly available or has a public IP, the phishing server will be exposed to the internet.
If the execution requires allowing the incoming traffic from a specific origin, the phish_server.trusted_origins option could be used to explicitly state the same.
SSLfying your admin server
Having your admin server run over HTTPS is generally a good idea. However, to accomplish this, you need to create a private key along with an SSL Cert for your admin server, and this can be done using OpenSSL by the below command:
openssl req -newkey rsa:2048 -nodes -keyout gophish_admin.key –
x509 -days 365 -out gophish_admin.crt
The above command would generate two files, i.e., gophish.key and gophish.crt. Now, place these files in the Gophish root directory and change the values of admin_server.cert_path , admin_server.key_path, and admin_server.use_tls to gophish.crt , gophish.key & true respectively.

Now all you need to do is answer the CSR process, and voila!! The next time you run Gophish, your admin server will be running with a pretty HTTPS protocol.
Getting started
Now that most of your setup is done, we can start with the rest by directly accessing GoPhish. To do this,
Open the browser and type the address https://127.0.0.1:3333 and you’ll be redirected to the Gophish login page. Use default login credentials to log into Gophish, i.e., admin || gophish

Given that the RDP you’re using has a public IP, it is generally a good idea to change your default password. However, the same can be done by visiting the “Account Settings” section of the Gophish and changing password from there.
GoPhish – Creating a landing page
Let’s assume you’re performing phishing to harvest the credentials of your target. You’ll need an HTML page to set up a phishing page that resembles a login page, which later would be used to fetch credentials entered by the user.
Landing pages are exactly that HTML page. Landing pages are the web pages the victim would be presented with when they visit the phishing server.

As stated in the GoPhish documentation, landing pages support templating, capturing credentials, and redirecting users to another website after they submit their credentials.
Note: Landing pages are stored in the database and Gophish generates a unique ID (called the `rid` parameter) for each recipient in a campaign, thereby utilizes this ID to dynamically load the correct landing page.
To preview what a landing page will look like, you will need to either use the HTML editor seen below or launch a test campaign. But simply browsing directly to the Gophish listener without specifying a `rid` parameter will display a generic 404 page.
To create a Landing page, click Landing Pages module on the sidebar and click New Page.

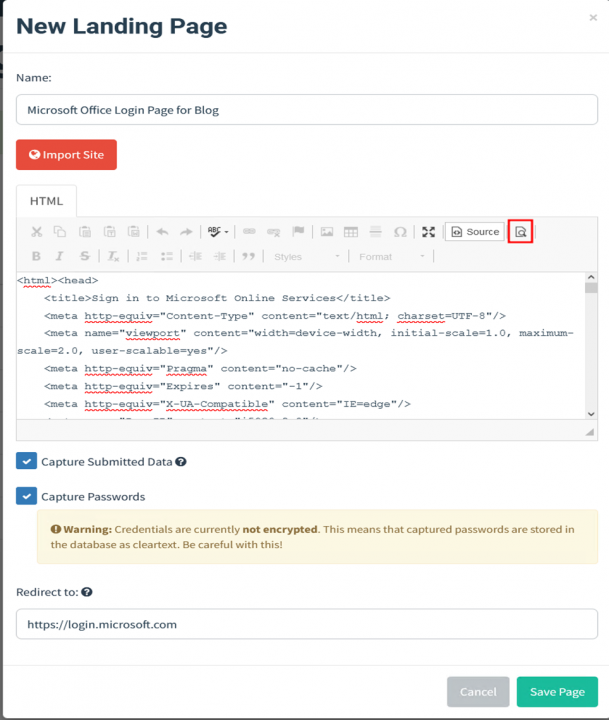
Enter the name of your landing page. For this execution, we’re using the classic Microsoft Office Login page.
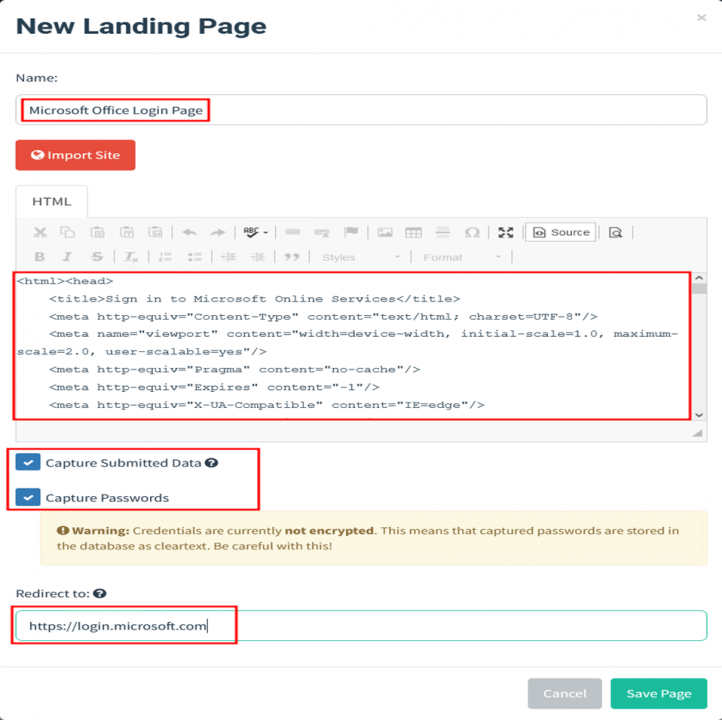
Above, we’ve submitted the old login page front-end code. This Landing page will also capture submitted credentials and eventually redirect the victim to the https://login.microsoft.com page once credentials are submitted. You can also preview the landing page by clicking on the lens icon on the top left of the HTML editor.

Once our landing page is confirmed, we can now move on to creating an email template.
2. GoPhish – Create Email Template
An email template in Gophish is the email sent to the victim. But they can be imported from an existing email or created from scratch. They also support sending attachments. Although you can create an email template, by visiting the “Email Templates” module on the sidebar and clicking New Template.

For this blog, we’ll be creating an email template with regard to job performance as the subject of the email.
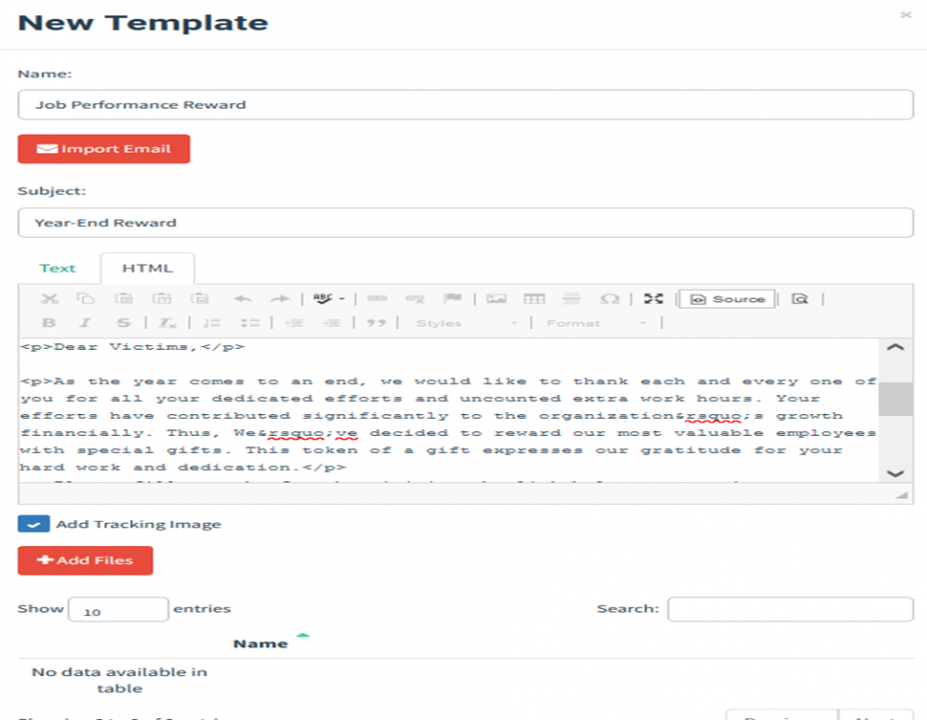

In the above email, there are a few key points that you need to remember. Adding links within the email that points to the landing pages. This can be done using the HTML editor and anchor tag. See below:
<a href=”http://{{.URL}}”>{{.URL}}</a>
Moving to the interesting part of the email, GoPhish allows you to track individuals who open your emails. This can be done by adding a tracking pixel to the email by adding {{.Tracker}} at in the email by clicking on the “Add Tracking image” button while creating the email template.
Note: It is recommended to send these phishing emails to yourself or any other testing accounts, as it’ll help you identify which issues you might be facing, such as emails landing in junk, emails getting blocked, etcetera. while trying to send these phishing emails to the victim.
3. GoPhish – Creating Users & Groups
Now that we’ve created an email that will be sent to the victim let us work on creating a group of the victim to whom the email will be sent.
“Groups” in GoPhish is a module that allows users to manage groups of users targeted in campaigns. Let us create a group containing the users’ list, first/last names, positions, and email addresses. To do this, visit the “Users & Groups” section on the navigation menu and click on the “New Group” button.

Enter the following details of your victim:
- First Name
- Last Name
- Position

Gophish also allows bulk import of users in CSV format by clicking on the “Bulk Import Users” button.
4. Setting up Email Profiles
As we near the end, we are done with most of the hectic tasks and are left with a few things. One of them is setting up email profiles, i.e. the, profiles that will be used to send emails to the victims.
To send emails to the victim, Gophish requires the user to configure their SMTP relay details within the “Sending Profiles” section.
Go to the Sending Profiles navigation entry in the sidebar and click New Profile button to set up your sending profile.

Here we’re using the SMPT server provided by GoDaddy.
It is important to ensure that the “From” address you enter is valid and also set up your “Host” in Host:port format. Along with your SMTP server, you also need to provide the username i.e., the email and the password for the account you’re going to use to perform the phishing campaign.
Once all the required details are entered, click Save Profiles to save.
5. Getting SSL to validate the Phishing domain
The last step before we start our execution is to provide a valid SSL certificate for our phishing server. You can create a user, “LetsEncrypt,” to generate a certificate for your custom domain that you’ve bought to perform phishing, or else you can use the SSLForFree website to generate SSL for your phishing domain.
To create an SSL using SSLForFree,
1. Visit the site https://www.sslforfree.com/ and register
2. Click on “New Certificate” to create a new SSL cert

3. Enter the name of the domain/sub-domain you want to generate the SSL certificate for.

4. Select the validity of the certificate. In this case, that’s 90 days.

Verify the domain. SSLForFree provides you with 3 options to do so. We generally go for the DNS verification as it is easier and takes let time.
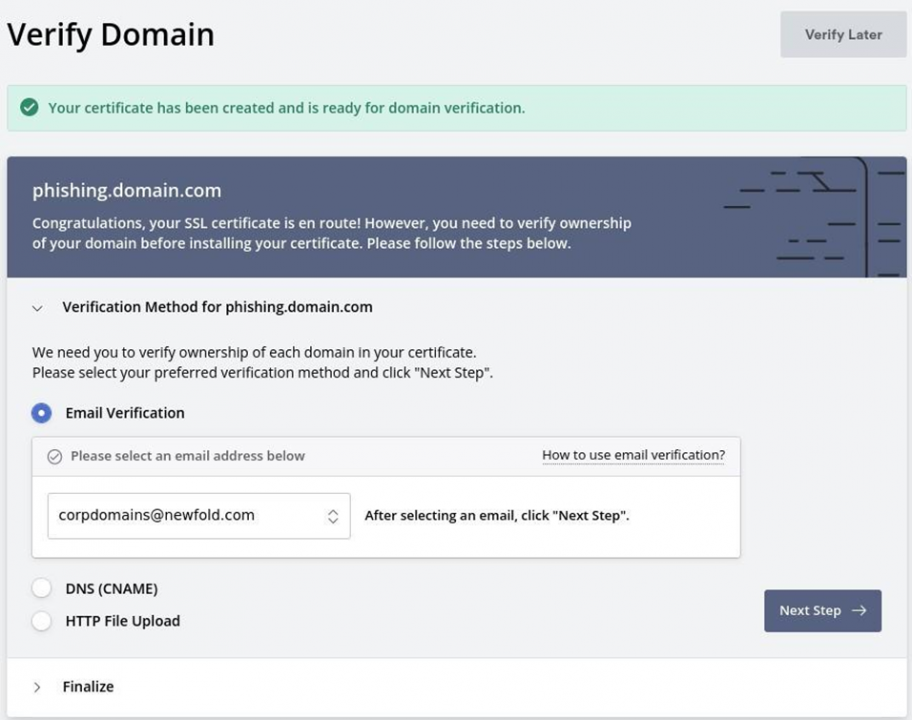
The last step is to verify the domain and SSLForFree does it for you and then provides you with the certificate and the private key.

Great news!! Now your domain has an SSL certificate, and you can execute the phishing attack.
6. GoPhish – Creating Campaign
Now that we’ve set up everything we need to perform the phishing campaign let’s jump right into it without wasting any more time.
To start your phishing execution, visit the “Campaigns” module in the left sidebar menu and click New Campaign to get started.

Now enter the necessary details, such as
- Email Template: The email template you’re going to send to the victim.
- Landing Page: The HTML page where you want to redirect the user to capture credentials.
- URL: The URL that’ll be used to perform redirection to the “Landing page.”
- Sending Profile: On behalf of whom the victim should receive the email
- Groups: The victims to whom you’re going to send emails.
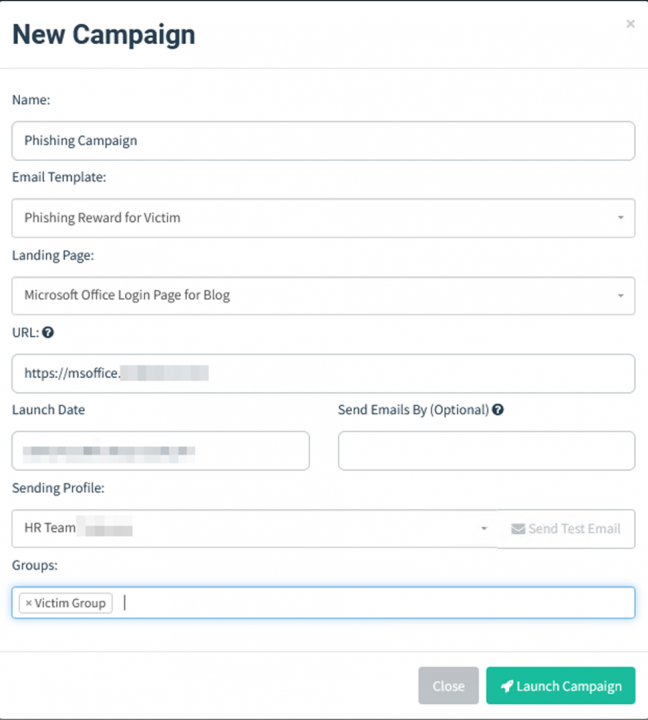
Click Launch Campaign to start your phishing campaign.

As the email has been successfully sent, your victim must now have received the email in their inbox.

Now when the victim opens the email, the tracking image gets downloaded, and GoPhish tracks the email while also marking it “Email Opened”, when visiting the link, the rid associated with the tracking link also enables Gophish to notify the user that the link has been opened.


So far, we’ve managed to trick the user into opening the phishing email and clicking on the malicious link. Now comes the part of credential harvesting. As the user is now required to login into their Office 365 account to move forward, they submit their credentials, which gets reflected back onto the Gophish dashboard.

Once the credentials are in place, you can check the dashboard and observe the harvested credential.


As the credentials were submitted, the user would now have been redirected to https://login.microsoft.com, as specified before in the “Landing page” section.

How to prevent phishing attacks?
Now that you know how to execute the phishing campaign, what are the consequences of falling for such phishing scams? It is generally a good idea to discuss how to prevent/avoid any phishing attempts.
Below are the few preventive measures:
Be a good observer
Phishing emails generally have a pattern wherein a sense of urgency is created. It has lots of spelling and grammatical mistakes, untimely emails, and emails generally asking you to submit forms. Such emails are generally phishing attempts to harvest sensitive information. It is wise to analyze the emails, talk to your colleague regarding the email and verify that the email is sent from a legitimate source.
Think before clicking
Phishing emails trick you into clicking links within the email. It is not advisable to click over the links blindly. However, the least you can do is hover over the link and see where it redirects you. Analyze the domain’s spelling; is it a legitimate domain or a domain similar to the original? But if the email requires you to log in, visit the website by directly typing the URL in the browser and avoid clicking the link within the email.
Do not open attachments
These phishing emails generally have some links in Excel, word, PDF, or PowerPoint, and these files are mostly malware or Macros and might gain remote access to your system if they’re interacted with.
Implement Firewalls
Firewalls are one of the most effective ways to prevent these external attacks. Either they completely block the phishing emails or send them directly to the junk folder of your emails.
Implement Email Security Software
Email Security S/Ws are designed to protect users from malicious hackers, malware, and phishing attempts. They can add an extra layer of security to your infrastructure and help secure the users. A few email security tools are Fortimail by Fortinet, “Proofpoint Email Protection Suite” by Proofpoint, Mimecast Secure Email Gateway by Mimecast, etc.
Employee Awareness Programs
These programs help your employees stay alert against malicious phishing emails and attempts. However, they become better at understanding how phishing works and how to spot, avoid and report them.
Word of Wisdom
Well, folks!! Now that you know enough about performing phishing campaigns on your own make sure you do not utilize this knowledge to harm an individual or an organization. If and when performing a phishing campaign, ensure you’ve permission from the organization against whom you’re running this campaign.
Do check out our other blogs, and make sure to leave your remarks about this blog.
Be vigilant, and be good!